
 So yesterday I received my very first Creation Crate package. This months subscription included all the wonderful goodies required to build your very first RGB arduino based mood lamp. Before we dive into this build let me first say that if you are looking to start working with arduino then Creation Crate is the perfect start. They ship everything you need from start to finish and offer excellent guidance along the way.
** Instructions
** An Arduino
** All Jumper cables
** Breadboard
** 3 Leds
** 1 Resistor
** A Light Dependent Resistor (LDR)
** The paper lamp cover
** Stickers
** Arduino Code ( Which I typed out and made it super simple for you to copy and paste in the sketchbook.)
 |
| Breadboard |
 |
| Resistors/LEDS/ jumpers |
 |
| My DIY Power supply now up and running. Check BLOG for Step by Step build. |
Gather materials and place LED's onto the breadboard. The longer leg (of the led's facing towards you.


(Diode and LED Polarity. Diodes only allow current to flow in one direction, and they're always polarized. A diode has two terminals. The positive side is called the anode, and the negative one is called the cathode.

Now take your resistor and LDR and connect those to the breadboard as shown. ** Make sure
that the two get connected on the same rail as shown in the picture.

Now we will begin by taking the 3 mini jumpers and connecting the led's. We do this by attaching the cathodes of the leds to the negative rail (blue) on the breadboard. Once they are all connected and you sit back and admire your progress then we move on.


after this has all been arranged you now have finished the trickiest part. Looks amazing doesn't it. Next step is setting up the arduino on your laptop or pc.
Step 4: Connecting to the Arduino
 The connection to the arduino from your breadboard are quite simple to understand. The arduino is labelled with numbers which make pin connections fairly simple. Basically it will say connect this to this pin and so on. So here we go RED LED : Pin (11) GREEN LED: Pin (10) BLUE LED: Pin (9) LDR: Pin (Analog 0)
Step 5: Hooking up the Arduino and Code

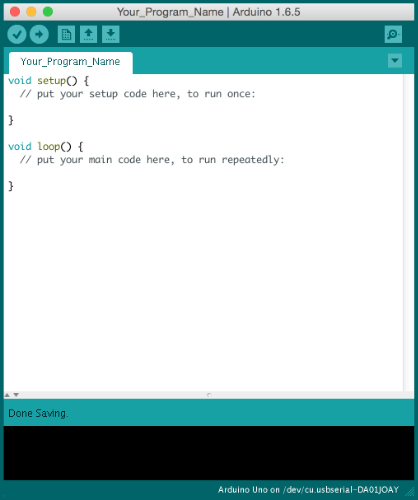 After you have completed the circuit now comes the exciting part of bringing your Creation Crate alive. Plug the usb into your computer and install the arduino program. This is free. After the install, open up the Arduino program. You will be greeted with this window which is called a sketchbook. The sketchbook allows you to write code and then upload it directly to your arduino board. The program includes alot of free codes already written for you to enjoy and is as simple as selecting your needs. This is the bread and butter of the Arduino world.
So once in the sketch window all you now need to do is copy the following code and place it in a blank sketch. Click upload and bammm you should be up and running.
*******CODE:

int pulseSpeed = 5; // how fast lamp runs
int ldrPin = 0; // LDR in Analog input 0
int redLed = 11; // red led in digital pin 11
int greenLed = 10; // green led in digital pin 10
int blueLed = 9; // blue LED in digital pin9
int ambientLight; // stores the value of the light in the room
int power = 150; // brightness 2-255
float RGB[3]; // this is an array
float CommonMathVariable = 180/PI;
void setup () {
pinMode(redLed,OUTPUT);
pinMode(greenLed,OUTPUT);
pinMode(blueLed,OUTPUT);
digitalWrite (redLed,LOW);
digitalWrite (greenLed,LOW);
digitalWrite (blueLed,LOW);
// this sets all the outputs to off
}
void loop (){
for (float x = 0; x < PI; x = x + 0.00001){
RGB[0] = power * abs(sin(x * (CommonMathVariable)));
// Red
RGB[1] = power * abs(sin((x + PI/3) * (CommonMathVariable)));
// green
RGB[2] = power * abs(sin((x + (2 * PI)/3)*(CommonMathVariable)));
ambientLight = analogRead(ldrPin);
// reads light and stores
if (ambientLight > 600) {
// makes the light only turn on if dark
analogWrite (redLed,RGB[0]);
analogWrite (greenLed,RGB[1]);
analogWrite (blueLed,RGB[2]);
}
else {
digitalWrite (redLed,LOW);
digitalWrite (greenLed,LOW);
digitalWrite (blueLed,LOW);
}
for (int i = 0; i < 3; i++) {
if (RGB[i] < 1) {
delay (20 * pulseSpeed);
}
else if (RGB[i] < 5) {
delay (10 * pulseSpeed);
}
else if (RGB[i] < 10) {
delay (2 * pulseSpeed);
}
else if (RGB[1] < 100){
delay (1 * pulseSpeed);
}
else {}
}
delay(1);
}
}
Finished:
}
Finished:

No comments:
Post a Comment